
Building and using HBase cluster |
HBase is an open source distributed column-oriented database built on the Hadoop file system with a scale-out architecture. Just as Bigtable leverages the distributed data storage provided by the Google File System, Apache HBase provides Bigtable-like capabilities on top of Hadoop and HDFS. With HBase, users can access(read/write) big data randomly in real time.
This article will walk you through the process of building an HBase cluster system.
Prepare three ubuntu-15.10 operating systems, one as the master node of the cluster, and the other two as the workers. The IPs of the three devices used in this example are:
Configure hosts on three ubuntus as described above:
192.168.13.105 master
192.168.13.52 worker1
192.168.13.199 worker2
The JDK needs to be installed on each device. You can download it from this link: https://www.oracle.com/technetwork/java/javase/downloads/index.html. This article will lead you to install jdk-8u111-linux-x64.tar.gz, the steps are as follows:
mkdir /usr/lib/jdk
mv jdk1.8.0_111 /usr/lib/jdk/jdk1.8
Method 1: Modify the global configuration file, which can be applied to all users. Enter the following command to open the global configuration file:
vi /etc/profile
Enter the following content:
export JAVA_HOME=/usr/lib/jdk/jdk1.8
export CLASSPATH=.:${JAVA_HOME}/lib:${JRE_HOME}/lib
export PATH=.:${JAVA_HOME}/bin:$PATH
Method 2: Modify the current user configuration file, only for the current user, enter the following command to start editing:
vi ~/.bashrc
The input content is the same as above.
source /etc/profile
or
source ~/.bashrc
java -version
Execute the command on master and worker nodes respectively:
ssh-keygen -t rsa -P
Among them, -P means password, an optional parameter. By default, you need to type in "Enter" key three times.
After the execution, two files will be generated in the /home/hdfs/.ssh directory:
Execute the following commands on the master and worker nodes respectively:
ssh-copy-id -i /home/hdfs/.ssh/id_rsa.pub [ip] (your own ip)
On the master node, you also need to execute:
ssh-copy-id -i /home/hdfs/.ssh/id_rsa.pub ip (ip of the worker)
Verify whether the configuration was successful on the master and worker nodes respectively:
ssh worker/master
First enter the path of the configuration files, for example: ../etc/hadoop, then enter the "ls" command to view the list of files in the path.
The files in the red box above need to be configured.
Configure the core-site.xml file. Enter the following command to edit the file:
vi core-site.xml
Content to be edited:
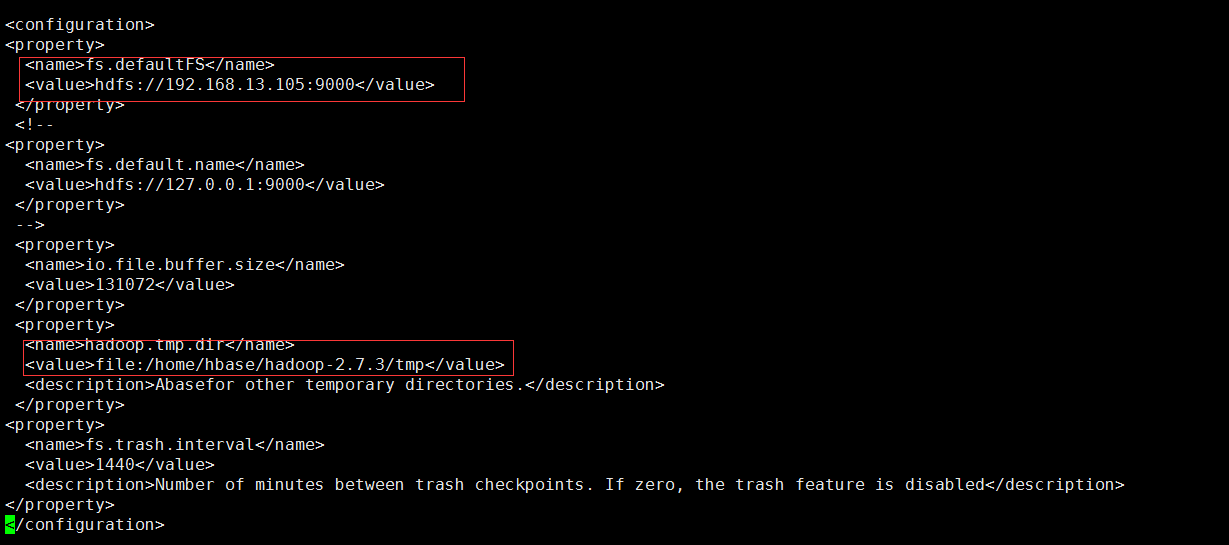
Note: The value in the hadoop.tmp.dir property is required to be the same with the .. /tmp path created in step 2.
Configure the hadoop-env.sh file. Enter the following command to edit the file:
vi hadoop-env.sh

Configure the JAVA_HOME as the native JAVA_HOME path
Configure yarn-env.sh. Enter the following command to start editing:
vi yarn-env.sh
Modify the JAVA_HOME to the native JAVA_HOME path (You need remove the "#" of this line)
Configure hdfs-site.xml. Enter the following command to edit the file:
vi hdfs-site.xml
Add the following code to <configuration></configuration>:
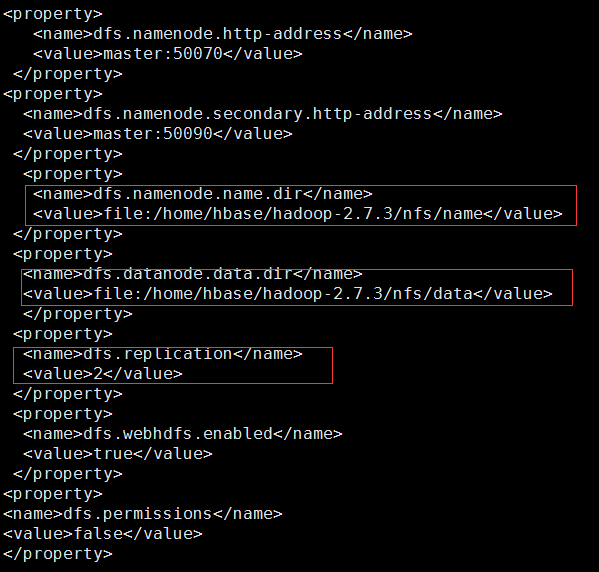
Note: The values of dfs.namenode.name.dir and dfs.datanode.data.dir are required to be the same with those of ../nfs/name and ..nfs/data created in step 2; since there are only two child nodes, so dfs.replication is set to 2.
cp mapred-site.xml.template mapred-site.xml
vi mapred-site.xml
Add the following code in the tag <configuration>:

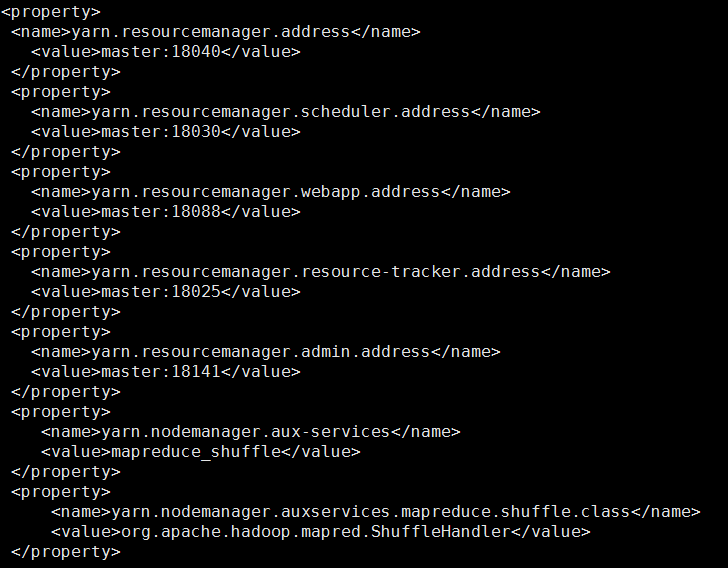
vi yarn-site.xml
Add the following code to the <configuration> tag:
vi slaves
Delete the original localhost and change it as the hostnames of the two child nodes:

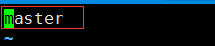
vi masters
Change to the host name of the primary node
vi /etc/profile
Type the command source /etc/profile to make the configuration take effect immediately

scp -r hadoop-2.7.3 root@worker1: /home/hbase/hadoop-2.7.3
scp -r hadoop-2.7.3 root@worker1: /home/hbase/ hadoop-2.7.3
Note: root is the username of ubuntu, which is set when worker1 and worker2 are created.
After the copy finished, perform path configuration on worker1 and worker2 as shown in step 10.
[root@master bin]$ ./hadoop namenode –format
[root@master sbin]$ ./start-dfs.sh
[root@master sbin]$ ./start-yarn.sh
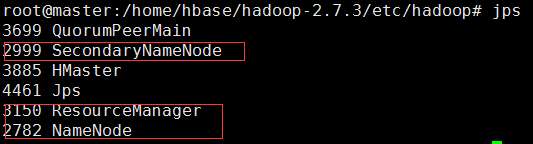
After typing jps on mater, it looks like this:
After typing jps in the worker1 and worker2 nodes, the following is displayed:
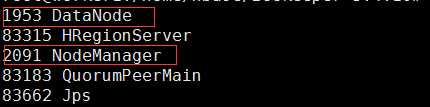
which indicates that the cluster was built successfully.
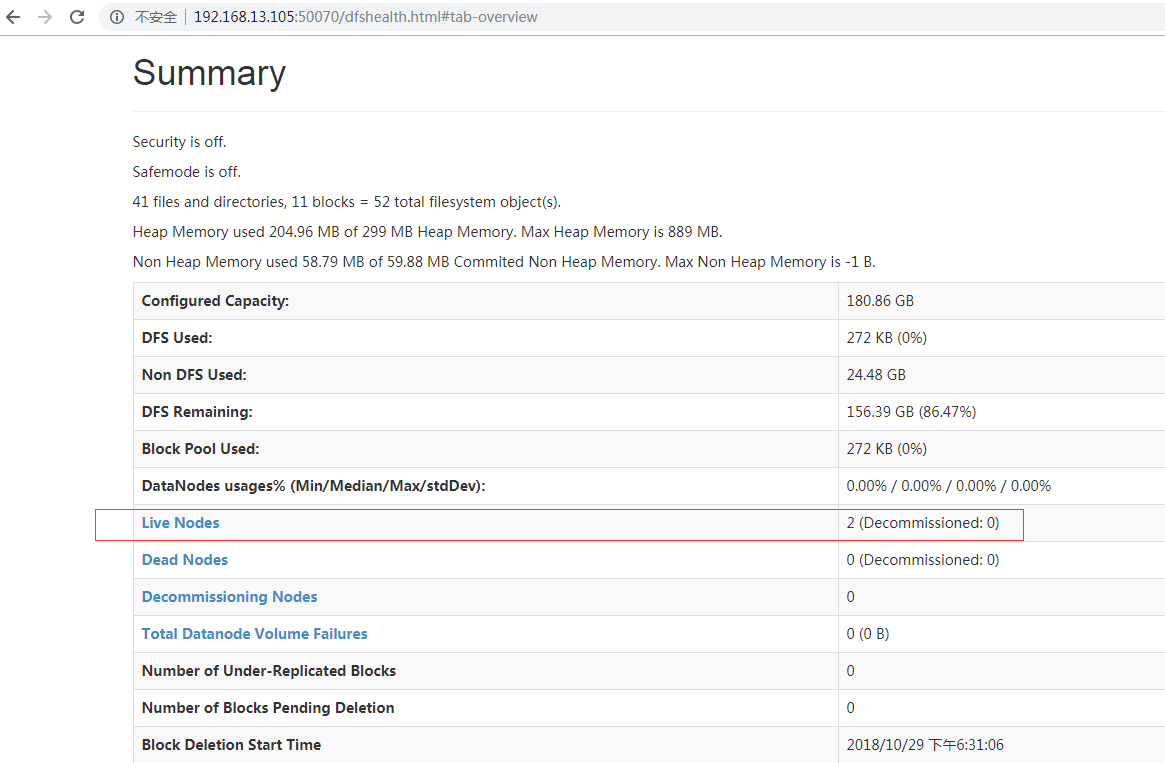
At this point, you can access the service on master node with http://192.168.13.105:50070. If the following interface appears, it shows the Hadoop cluster has been successfully built.
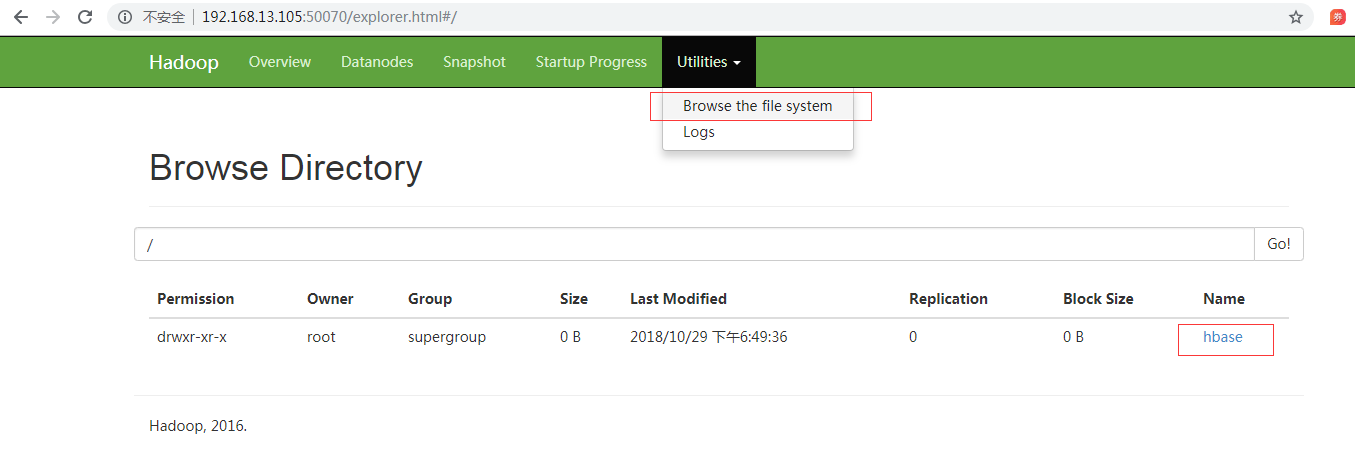
Create a new /hbase directory in the Hadoop cluster (for building the Hbase cluster)
hadoop fs –mkdir /hbase
View by clicking Browse the file system
If the connection cannot be created, the connection fails. Please check the ../conf/hdfs-site.xml and /etc/hosts files for redundant connection paths.
ZooKeeper is a high-performance coordination service for distributed applications and is an important component of Hadoop and Hbase. Its architecture is as follows:
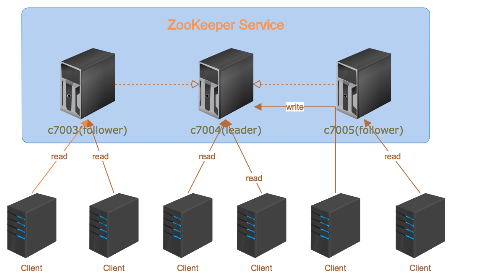
Among them, followers are responsible for responding to read requests, and leader is responsible for submitting write requests.
Below shows how to install the Zookeeper:
tar -zxvf zookeeper-3.4.10.tar.gz
Increase file permissions:
chmod +wxr zookeeper-3.4.10
cd zookeeper-3.4.10
mkdir data
mkdir logs
Note: Rename zoo_sample.cfg to zoo.cfg in the ../ zookeeper-3.4.10/conf/ directory (only one can exist).
Edit the renamed zoo.cfg file
vi conf/zoo.cfg
The editorial content is as follows:
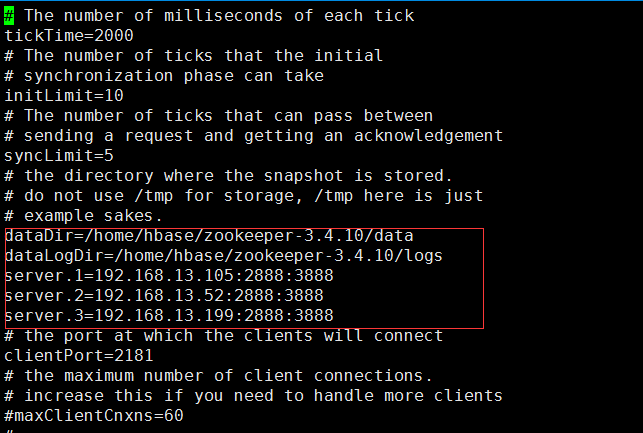
Enter the data directory and edit myid
cd data
vi myid

Consistent with the zoo.cfg file (server.1)
scp -r zookeeper-3.4.10 root@worker1:/home/hbase/zookeeper-3.4.10
scp -r zookeeper-3.4.10 root@worker2:/home/hbase/zookeeper-3.4.10
vi myid
[root@master zookeeper-3.4.10]$ bin/zkServer.sh start
[root@worker1 zookeeper-3.4.10]$ bin/zkServer.sh start
[root@worker2 zookeeper-3.4.10]$ bin/zkServer.sh start
[root@master zookeeper-3.4.10]$ bin/zkServer.sh status
ZooKeeper JMX enabled by default
Using config: /home/hbase/zookeeper-3.4.10/bin/../conf/zoo.cfg
Mode: follower
[root@worker1 zookeeper-3.4.10]$ bin/zkServer.sh status
ZooKeeper JMX enabled by default
Using config: /home/hbase /zookeeper-3.4.10/bin/../conf/zoo.cfg
Mode: leader
[root@worker2 zookeeper-3.4.10]$ bin/zkServer.sh status
ZooKeeper JMX enabled by default
Using config: /home/hbase /zookeeper-3.4.10/bin/../conf/zoo.cfg
Mode: follower
[root@master zookeeper-3.4.10]$ bin/zkCli.sh -server c7003:2181
If "Welcome to ZooKeeper!" appears, it means the zookeeper cluster is installed!
Other notes:
tar -zxvf hbase-1.3.0-bin.tar.gz
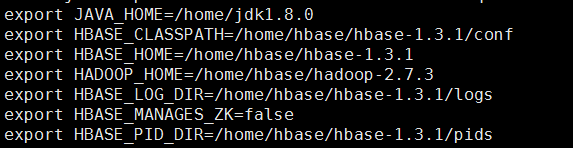
vi /etc/profile
Enter the following content:

Enter the command source /etc/profile to make it take effect immediately
Create a new pids directory under ../hbase-1.3.1
vi hbase-site.xml
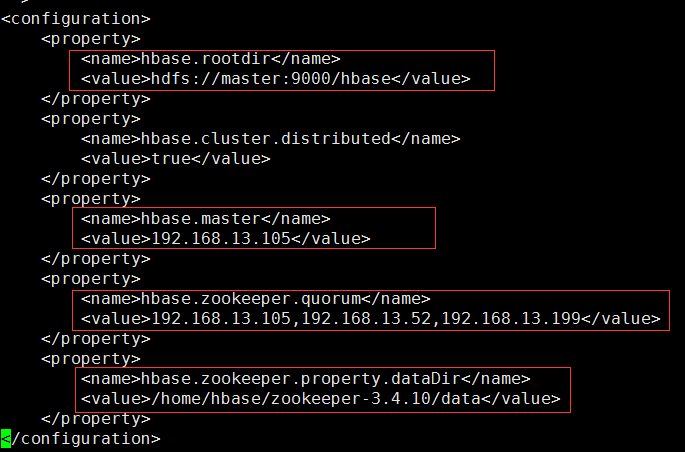
Among them:
vi regionservers
Delete localhost and add content:
worker1
worker2
scp -r hbase-1.3.1 root@worker1:/home/hbase/ hbase-1.3.1
scp -r hbase-1.3.1 root@worker2:/home/hbase/ hbase-1.3.1
[root@master hbase-1.3.1]$ bin/start-hbase.sh
Use the bin/hbase shell to enter the shell environment that comes with Hbase in any of the master, worker1, or worker2 machines, view the hbase information and operations such as creating tables with command version.
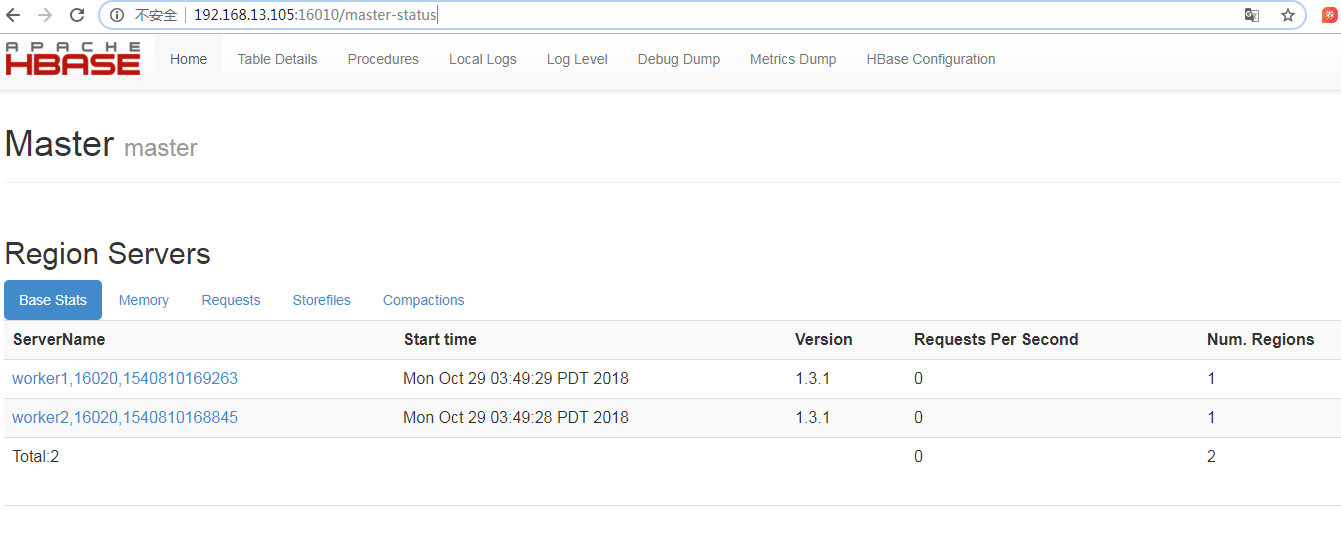
Access http://192.168.13.105:16010, if the following interface appears, it means the HBase cluster was successfully built:
To use the HBase in iServer, the hosts file of the computer where the iServer is located needs to be configured. You need to add the IP and port of the HBase cluster host to the hosts file as follows:
After the configuration is complete, the HBase can be associated with iServer via Data Registration of iServer, using as the datasource of Distributed Analysis Service, or the data storage location, or using as the service source to publish the data in it as map service and data service.